This is the multi-page printable view of this section. Click here to print.
Maintenance
- 1: Backups
- 2: Firmware Update
- 3: Installing SD cards
1 - Backups
Basic concept
The NOREYA NEXUS supports a snapshot system which allows you to save, revert and switch between system states at any time.
This system is used as basis for backups because it allows you to create consistent backups easily.
The backups are processed with a “minimal effect on the system” strategy.
This means that they are executed under low process priority with limited I/O bandwidth to avoid slowing down the smart home automation processes.
However, it cannot be guaranteed that the system will not experience increased latency during backups!
Backups via Control UI
The easiest way to create backups is via web interface.
Just create a snapshot and click on the “Start backup” button.
You must copy the password from the message box and save it on your device/computer because it will vanish soon and will not be stored anywhere!
I takes some time until the backup is finished, you can download it afterwards.
The backup is encrypted using the free open source tool GNUPG.
For Windows and macOS you need to download and install GNUPG, Linux based systems have it usually installed.
The decrypted file is a TAR archive, Linux and macOS systems can open it directly, for Windows you need a tool like the free 7ZIP or WinRAR.
Automated backups (for experts)
It is highly recommended to create automated backups and store them on a different device regulary.
There are many tools for this task and we give a few recommendations for the best options.
For starting/downloading the backups we recommend to setup an public/private key based SSH access.
Alternatively, you may trigger the backups via systemd timer (recommended) or a cronjob and download them via the http api.
Automated backups via Backup D-Bus API (for experts)
The Nexus Control UI uses a D-Bus API to handle the backups.
The same API is recommended for automated backups.
Benefits:
- Root less backup
- Ensured integrity
Contra:
- No support for incremental/differential backups
1) Setup a user with backup permissions (on the Nexus):
# Add a backup user, should be done using user "nexus"
sudo adduser remotebackup --gecos 'Backup'
# Setup API permissions for the user
sudo bash -c 'echo -e "[Backup permissions]\nIdentity=unix-user:remotebackup\nAction=tech.noreya.Backup1.Cancel;tech.noreya.Backup1.Create;tech.noreya.Backup1.Delete;tech.noreya.Backup1.GetList;tech.noreya.Backup1.Status;tech.noreya.Snapshot1.Activate;tech.noreya.Snapshot1.Create;tech.noreya.Snapshot1.Delete;tech.noreya.Snapshot1.GetList;\nResultActive=yes\nResultInactive=yes\nResultAny=yes\n" > /etc/polkit-1/localauthority/50-local.d/10-backup.pkla'
2) Create a backup.py script accessible by user “remotebackup” (on the Nexus):
#!/usr/bin/python3
import dbus
import signal
from time import sleep


def script_interrupted(signum, frame):
    print("\nScript aborted, backup does not stop!")
    exit(1)


signal.signal(signal.SIGINT, script_interrupted)

BACKUP_PASSWORD = "aaaaaaaaaaaaaaaaaaaaaaaaaaaaaaaaaaaaaa"

print("Creating snapshot...")

bus = dbus.SystemBus()
snapshot_object = bus.get_object("tech.noreya.Snapshot1", "/tech/noreya/Snapshot1")
snapshot_iface = dbus.Interface(snapshot_object, dbus_interface="tech.noreya.Snapshot1")

backup_object = bus.get_object("tech.noreya.Backup1", "/tech/noreya/Backup1")
backup_iface = dbus.Interface(backup_object, dbus_interface="tech.noreya.Backup1")

snapshot_id = snapshot_iface.Create(True, True, "Backup script")

print("Snapshot " + str(snapshot_id) + " created")

backup_iface.Create(snapshot_id, BACKUP_PASSWORD)

status = backup_iface.Status()
while status["id"] == snapshot_id:
    print("Backup progress: " + str(status["progress"]) + "%")
    sleep(5)
    status = backup_iface.Status()

print("Backup finished")
3) Test the script (on the Nexus):
if [[ $(whoami) != "remotebackup" ]]; then echo "You are not user 'remotebackup'"; exit 1; else python3 backup.py; fi
4) Install your backup servers ssh keys on the Nexus (on backup server / your computer):
# OPTIONAL, ON YOUR BACKUP SERVER: install ssh keys for remotebackup user
ssh-copy-id remotebackup@noreya-nexus.local
5) Download the backup (on backup server / your computer):
# Download from the backup server via http
wget https://noreya-nexus.local/nexus-backups/nexus_backup_${SNAPSHOT_ID}.tar.gpg
# Download via ssh
scp remotebackup@noreya-nexus.local/broot/backups/nexus_backup_${SNAPSHOT_ID}.tar.gpg ./
6) Schedule backups (on backup server / your computer):
The above example can be modified and adapted for all common backup solutions.
For example, a BackupPC configuration can look like this:
$Conf{DumpPreUserCmd} = '$sshPath -q -x -l remotebackup $host /usr/bin/python3 /home/remotebackup/backup.py';
$Conf{RsyncShareName} = [
  '/broot/backups'
];
Automated incremental/differential backups (for experts)
Tools like BackupPC or Bacula support incremental/differential backups which allows you to do them fast and store them efficient.
Benefits:
- Fast and efficient
Contra:
- Requires root access
#!/bin/bash -e

sudo adduser remotebackup --gecos 'Backup'

# **WARNING**: Ensure the user exists before you do this or this will break the system!!
# Give the user unlimited root access to the system
sudo sh -c 'echo "remotebackup  ALL=NOPASSWD: ALL" > /etc/sudoers.d/90_remotebackup'

# Create snapshot and save ID to variable
RESPONSE=($(sudo dbus-send --system --print-reply --dest="tech.noreya.Snapshot1" /tech/noreya/Snapshot1 tech.noreya.Snapshot1.Create boolean:true boolean:true string:"Automated backup"))
SNAPSHOT_ID=${RESPONSE[9]}
echo "Snapshot: $SNAPSHOT_ID"
Snapshot (Backup) directory
Backup the directory "/broot/snapshot/snapshots/${SNAPSHOT_ID}/" with your software via ssh.
Restoring (for experts)
There is currently no easy function available to restore a backup directly (work in progress).
You can copy/restore files from the backup via ssh/scp easily.
In case of total failure we recommend to setup a new SDCard and copy the backup files over after setup.
Please contact the support if you need help.
2 - Firmware Update
USB Modules
Please check the module pages for details.
SDBP Modules
Firmware updates for modules with SDBP update support can be done using sdbp-update utility.
IO Module and other SDBP Modules
First you have to stop the driver:
sudo systemctl stop nexus-drv-io
Run the update (replace X by the slot number):
sdbp-update update --start-bl --start-app --slot X /usr/share/nexus-mod-fw-io/*.bin
Start the driver:
sudo systemctl start nexus-drv-io
BMC & Power Module
This modules require the system to reboot before/after the system update.
This example is for the Power Module (Slot 1)
To set the device in bootloader mode perform this task:
echo "bootloader" > /etc/sdbp-bootloader/slot1
sudo reboot
Check if the device is in bootloader mode:
cat /sys/class/sdbp/slot1/bootloader_state && echo ""
If the value is “2” it is in bootloader mode.
Run the firmware update:
sdbp-update update --slot 1 /usr/share/nexus-mod-fw-power/*.bin
If the update succeded:
echo "application" > /etc/sdbp-bootloader/slot1
sudo reboot
3 - Installing SD cards
Note
The Mainboard comes with pre-flashed SDCards, flashing the SDCards is in general not required.Introduction
The NOREYA NEXUS uses two SDCards in mirrored (RAID1) mode.
For details see the Mainboard docu.
Pre-requirements
To flash the SDCards you need:
- A microSD card compatible reader
- Two compatible SDCards of at least 64GB size
- Running the SDCards in mirrored/RAID mode requires verified SDCards. We have tested a lot and not every SDCards works in this mode.
- Using incomaptible cards may result in broken/resyncing RAID or total system failure.
- You must use two SDCards of the same size.
- You must always use two different SDCards to ensure the do not fail at the same time.
- You must only use a pair of official SDCards. We sell them as spare part in our online shop.
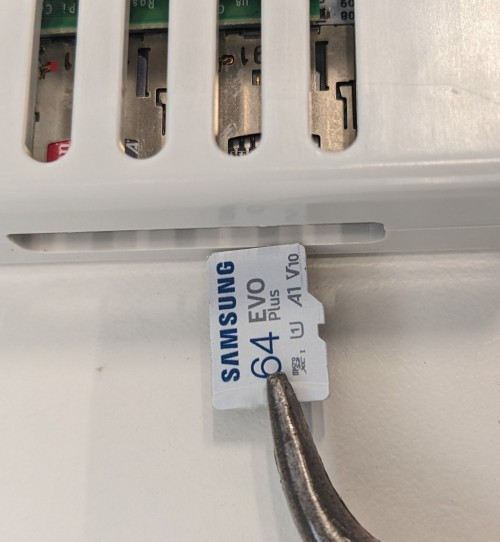
Replacing SD cards
- Do not use force during this procedure, otherwise the SD cards may be damaged!
- Removing the SD card requires small pliers or tweezers. Tool-free removal is not possible.
- The system must be switched off and the Power Module disconnected from the power supply and removed.
If it is mounted on a rail, it is strongly recommended to dismantle it for this process.
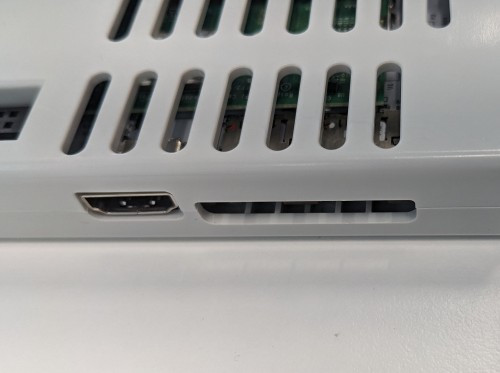
Initial state:
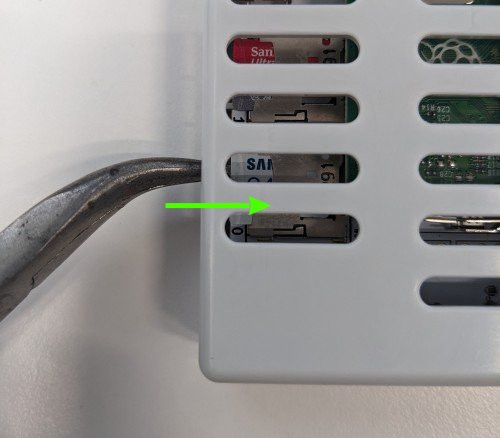
Gently press the SD card inwards to release its lock
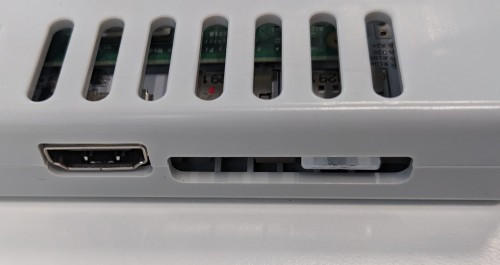
The situation should look like this
Remove the SD card with the pliers
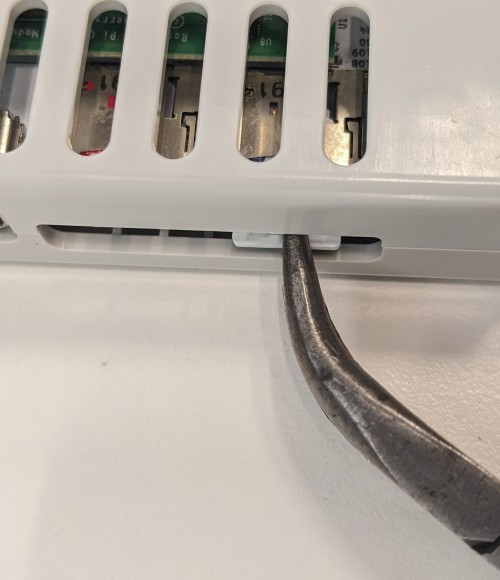
The SD card is now removed
Inserting SD cards
Follow the procedure in reverse order
Downloads
Download the latest os image.
Download balena Etcher to flash the SDCards.
Flashing
For Linux Users
The SDCard contains a “md” raid which may be detected by the OS.You should stop it before flashing the SDcard using
mdadm stop /dev/mdX.You should also stop the md-raid after flashing it (if it comes up).
Please note that some versions of md change the default number of the md-raid.
This breaks the boot as the default number must be md42.
It can be fixed using
mdadm --verbose --assemble --update=super-minor --run /dev/md42 /dev/sdaX.
Note
You must always flash both SDCards- Insert the SAMSUNG SDCard into the SDCard reader.
- (Backup the old data if needed)
- Start the Etcher, select the os image and the inserted SDCard
- Wait for the process to finish
- Insert the SANDISK SDCARD into the SDCard reader.
- (Backup the old data if needed)
- Start the Etcher, select the dummy image and the inserted SDCard
- Wait for the process to finish
- Insert the SDCards into the Mainboard
- The SAMSUNG card must be in SDCard Slot 0
- The SANDISK card must be in SDCard Slot 1
USB Bootloader (for experts)
The NOREYA NEXUS can also be flashed without removing the SDCards or an SDCard reader.
For this the official Raspberry Pi Usbboot is required.
- Install usbboot/rpiboot
- Start rpiboot
- Shutdown the Nexus using the power switch on the front
- Wait for the system to shutdown
- Connect the Mainboard using the USB Port C to your device
- Turn on the Mainboard using the power switch, press the bootloader/reset button on the Mainboard for 3 seconds until the sound appears and release it immideatley (holding it for 6 seconds will reset the bmc firmware)
- rpiboot should detect the device within 90 seconds
- The Mainboard resets after 30 seconds for 3 times (90 seconds in total) if it is not detected by rpiboot.
It will automatically boot back to normal if no connection could be established!
- The Mainboard resets after 30 seconds for 3 times (90 seconds in total) if it is not detected by rpiboot.
- The SDCard 0 should appear as disk on your device
- Flash it with Etcher like described above
- Start the Mainboard by turning the power switch back on after flashing
The second SDCard is usually unused after boot.
You can login via console to fix it:
sudo dd if=/dev/zero of=/dev/mmcblk1 bs=1M count=1
It will start syncing after a few minutes automatically.